G2 TOTSI HUD (G2TH) Instructions
* Main panel *
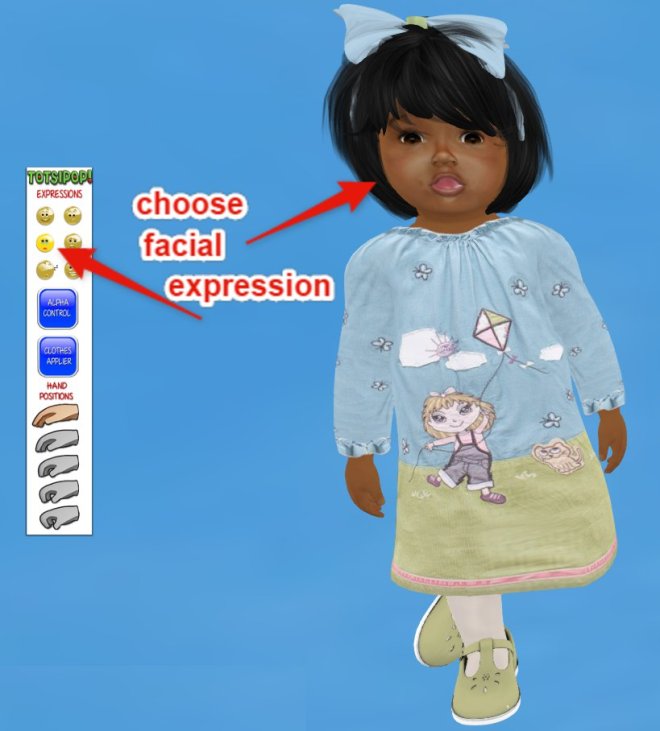
Expression – to change your expression, tap on one of the 6 facial expressions on the top of the HUD
Hand – to change your hand position, tap on one of the 5 hands on the bottom of the HUD
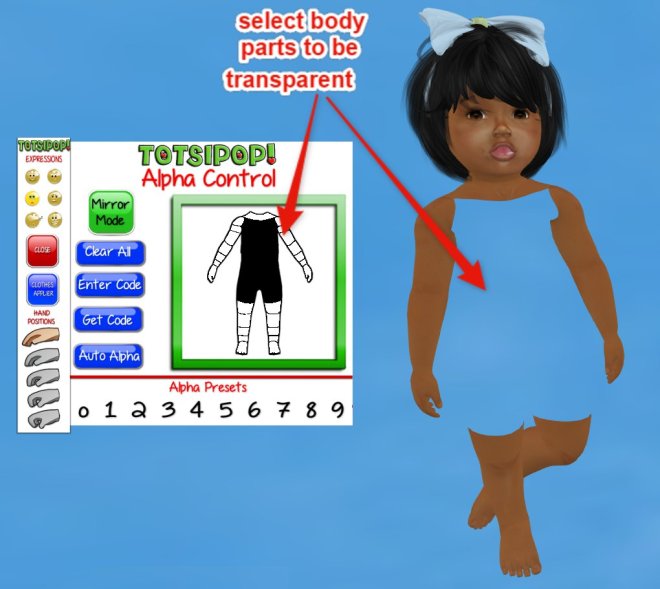
*Alpha panel* (push the “Alpha Control” button)
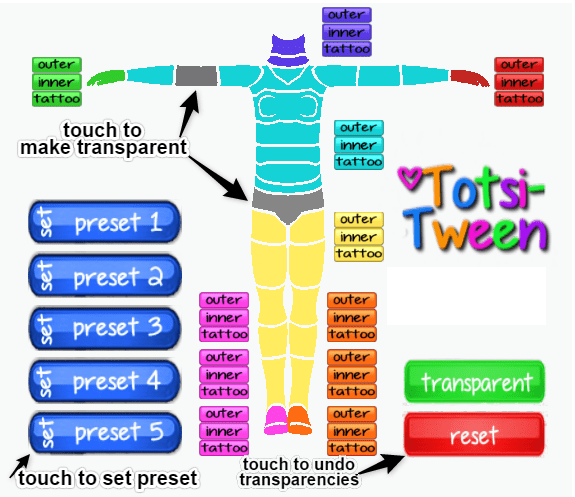
The G2 TOTSI HUD has a TON of alpha cuts for you to use should your skin show thru your clothing. To make parts of your avatar’s body transparent, push the “alpha control” button. You will see a picture similar to the avatar’s body in the panel. Tap the section of your body that is showing through your clothing and watch it disappear! Press the “clear all” button to show all sections of the body again.
The G2TH offers the option of 10 Alpha Presets. To create a preset, wear the G2TH, touch the “Alpha Control” button, tap the parts of the body you would like to be transparent and touch one of the numbers (0-9) on the bottom of the Alpha Panel.
You will see a menu in the upper right hand corner of your screen – Press “save”. Touch the same number again and see the menu in the upper right hand corner of your screen – Press “set name”. Type in a name for the preset you have just created. Press “submit”.

Now whenever you press that number on the bottom of the Alpha Panel, a menu will come up with the name you have chosen for this preset. Choose “wear” and the body will become transparent according to your preset! When you no longer need to wear the preset, just tap the “clear all” button or tap the preset number and choose “remove”.
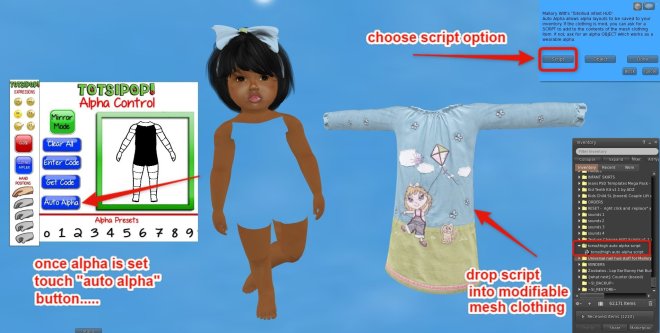
If you would like parts of your mesh body to become transparent automatically when you wear a specific outfit, you can use the “Auto Alpha” option. This option works with both modifiable and non-modifiable mesh clothing. (see below)
To create an auto alpha for a modifiable mesh outfit; (simple)
Rez your modifiable mesh clothing in world. Touch the “Alpha Control” button found on the Main Panel of the G2TH, choose the parts of the body you would like to be transparent and click the “Get Code” button. Look for the special alpha code in your nearby chat bar and copy this code.

Right click your rezzed mesh clothing and choose edit. Paste the special alpha code into the description of the mesh. Next, tap the “Auto Alpha” button, choose “script” from the menu at the top right corner of your screen. When you receive the script, click on the “recent” tab of your inventory, find the script, right click your rezzed mesh, choose edit, pick the contents tab and drop the script into the contents of the mesh. Now every time you wear this mesh outfit, the parts of the body you have chosen will become transparent automatically. When you remove this mesh, the alpha will also be removed.
To create an auto alpha for a non-modifiable mesh outfit; (advanced)
Auto alpha object is an extra attachment you can wear along with the non- modifiable clothing item in order to apply the alpha you set.
To create an Auto alpha object, touch the “Alpha Control” button found on the Main Panel of the G2TH. Choose the parts of the body you would like to be transparent and click the “Get Code” button. Look for the special alpha code in your nearby chat bar and copy this code. Next, tap the “Auto Alpha” button and choose “object” from the menu at the top right corner of your screen. At the next prompt, name the folder for your Alpha Object and click the “submit” button. Go to “recent” tab in your inventory and find the Alpha Object folder you just named. Rez this Alpha Object in world, right click the rezzed Alpha Object, choose edit, and paste the special alpha code in the description of the Alpha Object. Now every time you wear this Alpha Object you created, the parts of the body you have chosen will become transparent automatically. When you remove the alpha object, the alpha will also be removed.
NOTE: You only need to set up the alpha for the mesh item or Alpha Object once, then just wear and remove just like regular SL clothing to apply the alpha set.
*Clothing Panel* (push “clothes applier” button)
The G2 TOTSI HUD provides you with three clothing/tattoo applier layers (outer, inner and head)
Outer – for undies or clothes you would like to wear underneath your mesh clothing
Inner – for tattoos (chicken pox, dirt, booboos etc.) you would like to wear beneath your undies
Head – for face paint, dirt, booboos you would like to show on your face/head

There are two options for your use of the Outer and Inner layers:
Option 1 – Simple < Wear either the outer or inner layer and apply various underwear to them with the G2 Clothing HUD> If you choose this option, double click one of the outer/inner layers provided in the HUDs Box that came with your purchase (package titled “TOTSIPOP! G2 extra set of applier layers”) – you will see the layer appear on your avatar. Double click the G2 Clothing HUD also provided in your HUDs box that came with your purchase – you will see the G2 Clothing HUD on the bottom left corner of your screen. Touch the “select” button to see your clothing options in the top right corner of your screen. Choose your style and touch the “apply” button to apply the style you selected to the clothing layer you are wearing. Continue to wear the same outer and inner clothing layers and use the G2 Clothing HUD to change your style.
It is best to apply textures to one layer at a time – if both the inner and outer layers are worn when using the Clothing HUD, your chosen style will be applied to both layers. To avoid this, you can lock the layer you DO NOT want to change by touching the lit (green) button on the G2TH. When that button turns red, the texture on the layer will be locked. To unlock the texture, touch the red button again.
To summarize the G2TH Clothing layer buttons:
Grey = you are not wearing this layer
Green = you are wearing this layer and the texture can be changed
Red = you are wearing this layer and the texture is locked.
Option 2 – Advanced <Create a new piece of clothing for each style applied with your G2 Clothing HUD > If you choose this option, wear your G2TH, go to clothing applier panel, pick the type of layer you need (upper, lower, combi) and touch the “give” button. You will see a menu on top right of your screen asking you to name the folder that will contain this new article of clothing. Once named, G2TH will deliver it to your inventory in a folder with that same name. Go to “recent” tab in your inventory and find the named folder . Double click on the blank layer inside to wear it.
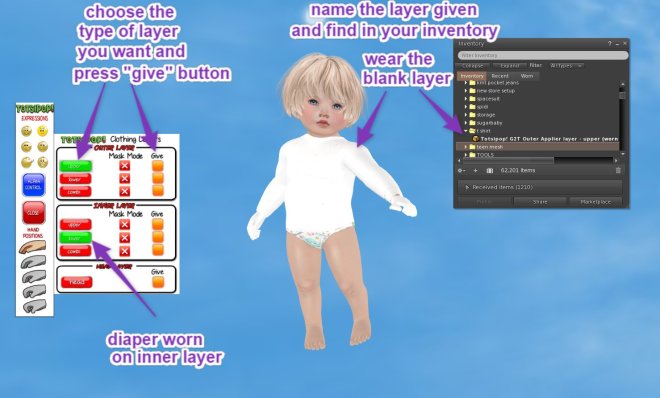
Then double click the G2 Clothing HUD in your inventory. You will see the G2 Clothing HUD on the left of your screen. Touch the “select” button to see your clothing options and touch the “apply” button to apply the style you selected to the clothing layer you are wearing. Go back to the clothing applier layer on your G2TH and tap the green button representing the worn layer. Once the buttons turn red, the texture is locked on the mesh layer. You have created a piece of clothing for your avatar!

Head Layer
This layer is worn on the head for face paint and such. The G2TH Head layer control can be found on the bottom of the “Clothing Layer” panel. To receive a head layer that fits your avatar’s head – either Elf or Human – touch the “give” button in the Head Layer section and the G2TH will automatically deliver the correct head layer for the avatar you are wearing. You will see a menu on top right of your screen asking you to name the folder that will contain this new head tattoo. Once you have named the new head tattoo, G2TH will deliver it to your inventory in a folder with that same name. To add a tattoo with the G2 Clothing HUD that includes a head and body texture, double click the head tattoo layer and tap the “apply” button on the G2 Clothing HUD. When not wearing a head tattoo, double click again to remove the head layer.
Mask Mode
When you wear both the outer and inner clothing layers at the same time, you may see some flickering. This is because one or both of the clothing layers contains transparencies and SL is unsure of which layer to show. This problem can be solved by 1) removing one of the layers OR 2) switching one of the layers to “mask mode”. To switch to “mask mode”; wear the G2TH, touch the “clothing applier” button, and click on the “mask mode” box that corresponds with one of the layers you see flickering (upper, lower or combi will be lit up) Mask mode will change the look of the textured layer so you want to look closely at your outfit when using it.
The G2TH offers a second revolutionary solution to a problem all mesh avatars face – clashing textures! For example, if you are wearing socks on an inner layer and shorts on an outer layer, even though the socks and shorts don’t take up the same space on the body, they will still clash – causing one or the other to disappear. (we don’t want that when you are wearing shorts cuz you will be nakey!) . Smart mask enables two items of this type to be worn without causing a clash even with mask mode switched off!!
To set up a Smart Mask for an applier layer, wear the layer and then use the alpha control to hide all parts of the body that do not have any part of the clothing visible. So with the example of socks, you’d hide all of the body except for the feet and ankles up to the top of the socks. When you have the alpha set up, press the “get code” button from the Alpha Control panel in the G2TH. You will see a code in local chat. Detach the applier layer, rez it on the ground, and put the alpha code your received in local chat into the description of the applier layer. Pick it back up again and then when you wear it, it will use smart masking automatically. You can still set mask mode on an applier that has smart masking set up, for example if you wanted to wear those shorts over top of leggings, where the two do overlap, you’d still need to use mask mode. However when you switch mask mode off, it will revert to using smart masking. FANTASTIC!
G2 Clothing Hud Instructions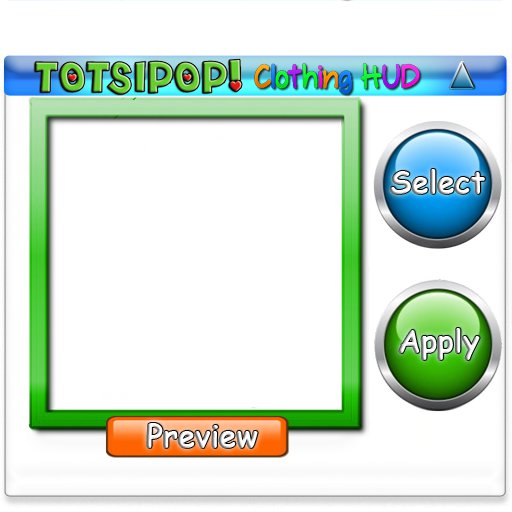
I hope you enjoy our new Clothing HUD for your TOTSI mesh baby avatar! It is pretty easy to use in tandem with the G2TH HUD:
- First step is to wear your Clothing HUD and your Generation 2 TOTSI HUD (G2TH) . To do this double click on both of the HUDs included with your TOTSI avi (you will find them in your HUDS box).
- Second step is to wear your applier layer so the Clothing HUD can apply the clothing on your avatar. There are two options for where to find your applier layer:
- Option 1) Simple – Find a box in your HUDS package titled “TOTSIPOP! G2 extra set of applier layers”. Rez it, right click and choose “open” to unpack and go to the “recent” tab in your inventory to find the folder with the same name. Inside the folder you will find seven applier choices – inner upper, inner lower, inner combo, outer upper, outer lower, outer combo, and head applier.
- Option 2) Advanced – open the Clothes Applier panel in your G2TH. You will see on the right side of the panel several orange “give” buttons. Find the applier layer you want by looking at the grey buttons under each category: OUTER then outer upper, outer lower, outer combo or INNER then inner upper, inner lower, inner combo. Touch the “give” button to receive the applier layer of your choice in your inventory. You will see a menu on top right of your screen asking you to name the folder that will contain this new article of clothing. Once named, G2TH will deliver it to your inventory in a folder with that same name. Go to “recent” tab in your inventory and find the named folder . Double click on the blank layer inside to wear it.
- The inner applier layers fit closer to your body and under your mesh clothing. The outer applier layers are not as close to the body and less likely to fit under your mesh clothing. Upper layers can be used for clothing items such as shirts, lower layers can be used for clothing items such as pants, combo layers are both upper and lower and can be used for clothing items such as onsies.
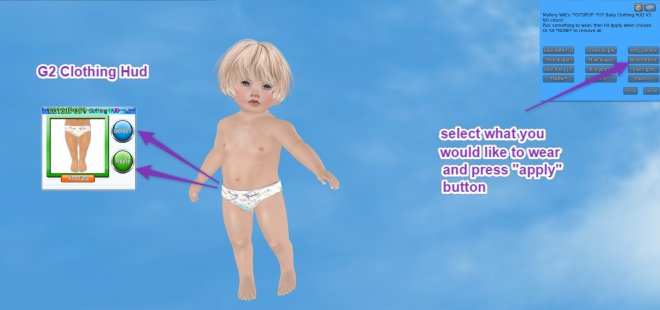
- Next, decide what you would like to wear 🙂 To choose your clothing, just click on the blue”select” button found on your Clothing HUD (bottom left of screen). You will see a menu on the top right of your screen. This menu lists all the options in your HUD for clothing. Once you choose an option, you will see a picture of what it will look like on your avi in the preview panel. I have tripled the amount of options you have to choose from with the G2 product so be sure to look at them all!
- Once you have decided what you want to wear, Select green “apply” button to put on the clothing you have chosen.
- It is best to apply textures to one layer at a time – if both the inner and outer layers are worn when using the Clothing HUD, your chosen style will be applied to both layers. To avoid this, you can lock the layer you DO NOT want to change by touching the lit (green) button on the G2TH. When that button turns red, the texture on the layer will be locked. To unlock the texture, touch the red button again.
- To take clothing off, choose the “none” option on the menu. Be careful when choosing this option as you will be naked. Be sure you are in a safe place!
Clothing options can be tinted to fit your mood. To tint your clothing, take off your applier layer, go into edit mode, rez the base, choose texture tab, click on color box and tint to your heart’s desire!
This HUD allows infinite opportunity for fashion styles. Future clothing styles sold in TOTSIPOP! Mainstore will include new clothing options to add to your Clothing HUD in the form of a notecard.
If you receive a notecard with a new TOTSIPOP! clothing set, you must add the notecard to your Clothing HUD to use it. Rez your HUD on the ground, right click, choose edit, drag the notecard from your inventory into the contents of your HUD and take the HUD back into your inventory. The next time you wear the HUD, a new clothing option will show up in your menu!
Have fun and contact TOTSIPOP! Customer Service with any questions AFTER reading all the instructions